How to Setup Stable Diffusion With AUTOMATIC1111 Web Interface On AWS(Amazon Web Services)
How to Setup TechLatest Stable Diffusion With AUTOMATIC1111 Web Interface On AWS(Amazon Web Services)

Bringing the latest tech to grow your business. AWS, GCP & Azure registered partner and cloud solution provider on latest tech.
Introduction
Technology makes our life easier day by day, Technology has definitely improved our quality of life in many ways. It has made communication easier and more convenient, it has made transportation faster and more efficient, and it has made many everyday tasks much easier to accomplish.
Stable Diffusion is a type of generative model that has recently gained traction due to its effectiveness and accuracy in generating high-quality images.
In this article, we will provide an overview of Stable Diffusion, and guide you on how to install, set up, and run it on Amazon Web Services(AWS) in just a few minutes. By utilizing the pre-configured virtual machine provided by Techlatest.net on the AWS Marketplace, you can easily access and utilize Stable Diffusion for your specific use case.
In this article, we will introduce four services
Stable Diffusion — Stable Diffusion is a deep learning, text-to-image model released in 2022.
AUTOMATIC1111 Web Interface — A browser interface based on the Gradio library for Stable Diffusion.
AWS(Amazon Web Services) — Amazon Web Services (AWS) is the world’s most comprehensive and broadly adopted cloud platform, offering over 200 fully featured services from data centres globally.
Step by Step guide — Guide on how to set up Stable Diffusion on GCP.
What is Stable Diffusion?
- Stable Diffusion is a deep learning, text-to-text model released in 2022. It is primarily used to generate detailed images conditioned on text descriptions, though it can also be applied to other tasks such as inpainting, outpainting, and generating image-to-image translations guided by a text prompt. It was developed by the start-up Stability AI in collaboration with several academic researchers and non-profit organizations.
What is AUTOMATIC1111 Web Interface?
- A browser interface based on the Gradio library for Stable Diffusion.
What is AWS(Amazon Web Services)?
- Amazon Web Services (AWS) is a cloud computing platform that provides a wide range of cloud-based services, including computing power, storage, databases, networking, analytics, machine learning, and many other tools and services to help individuals and organizations build and run their applications and services in the cloud. Some popular AWS services include Amazon EC2 (Elastic Compute Cloud), Amazon S3 (Simple Storage Service), Amazon RDS (Relational Database Service), Amazon DynamoDB (NoSQL database), Amazon Lambda (serverless computing), and Amazon SageMaker (machine learning service), among many others.
Prerequisites for deploying Stable Diffusion on AWS (Amazon Web Services)
AWS(Amazon Web Service) Account.
Computing requirements: Stable diffusion requires a lot of processing, so a GPU instance is recommended. If you want to use a CPU instance due to the high price of GPU instances, you should use instances with a higher CPU.
GPUs are not available in some zones and for some instance types.
Below are recommended VM configuration requirements on AWS:
GPU VM: g4dn.X-Large (4 VCPU, 16GB memory) configuration.
CPU VM: t2.xlarge (4 VCPU, 16GB ram).
For CPU, it’s the minimum spec but more CPU is preferred.
Important Note: GPU instances will perform 10 times or faster when processing requests compared to CPU instances. A typical GPU instance will take 1–2 minutes to render images compared to 10–20 minutes by CPU instance, hence GPU instances are preferred.
Step by Step Guide to install, setup, and run Stable Diffusion with AUTOMATIC1111 UI on AWS (Amazon Web Services)
This step-by-step guide describes how to launch and connect to Techlatest’s Stable Diffusion with AUTOMATIC1111 Web Interface on Amazon Web Services(AWS).
Step 1
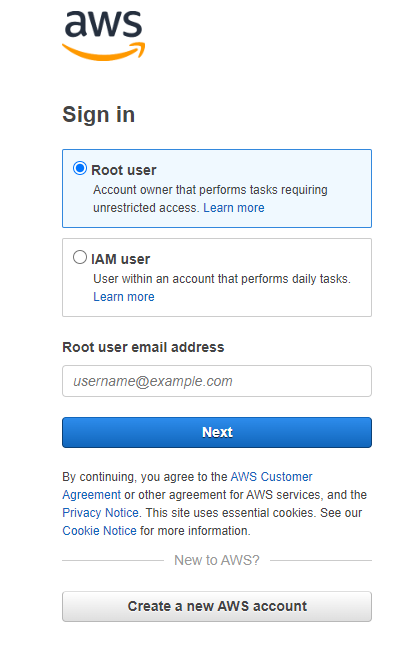
Sign in to Your AWS Account with your credentials(email and password), if You don`t have an account then create a new AWS account from the button. If You are using it for your personal use, then select IAM user Option and if you are working for any organization, then select the Root user Option.
Step 2
After Login, Go to AWS Marketplace and Search Techlatest Stable Diffusion with AUTOMATIC1111 Web Interface VM.

Step 3
After the opening of TechLatest Stable Diffusion with AUTOMATIC1111 Web Interface VM listed on the AWS marketplace, Click on Continue to subscribe.
Step 4
After Subscribing, click on the Continue to Configuration Button.

Step 5
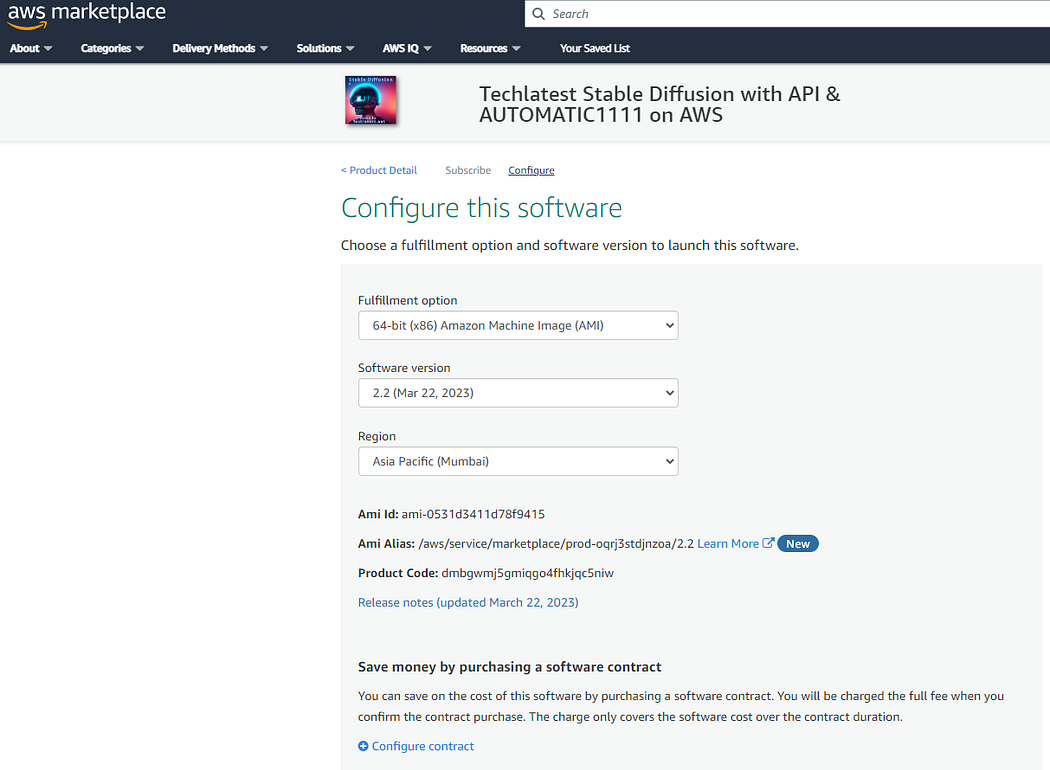
After Clicking on the Continue to Configuration Button. Select a Region where you want to launch the VM(such as Asia Pacific (Mumbai)).
Step 6
After Choosing the Region, Choose the Action like how You can launch it through EC2 or from Website. (Let’s choose Launch from the website).
Optionally change the EC2 instance type. (This defaults to t2.xlarge instance type, 4 vCPUs, and 16 GB RAM.)
Optionally change the network name and subnetwork names.

Step 7
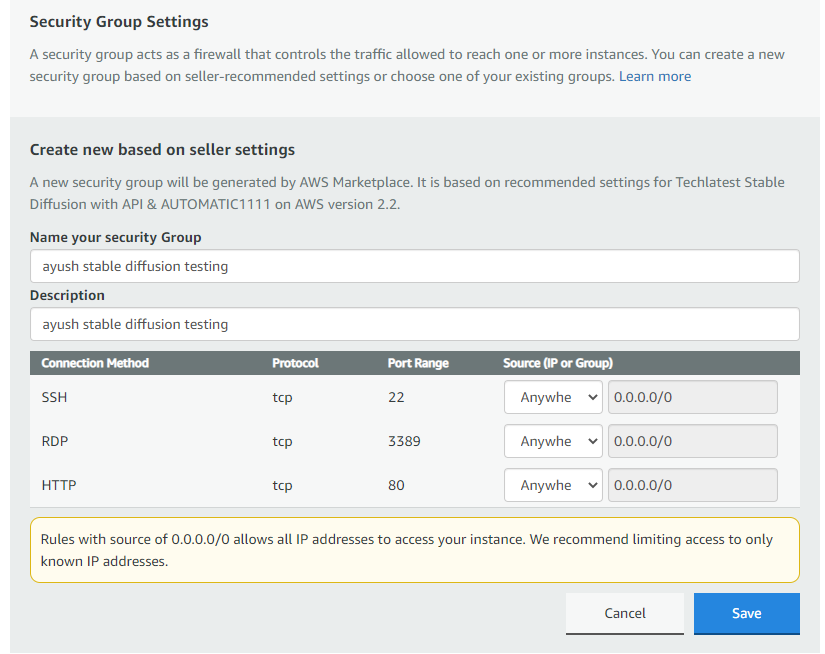
After Completing these all steps, Select Security Groups, you can also create a new security group from the below button, in this tutorial we have created a new one, let’s try this, After Creating Security Group Give name and Description and click on the save button, Now Your New Security Group has been created.
Step 8
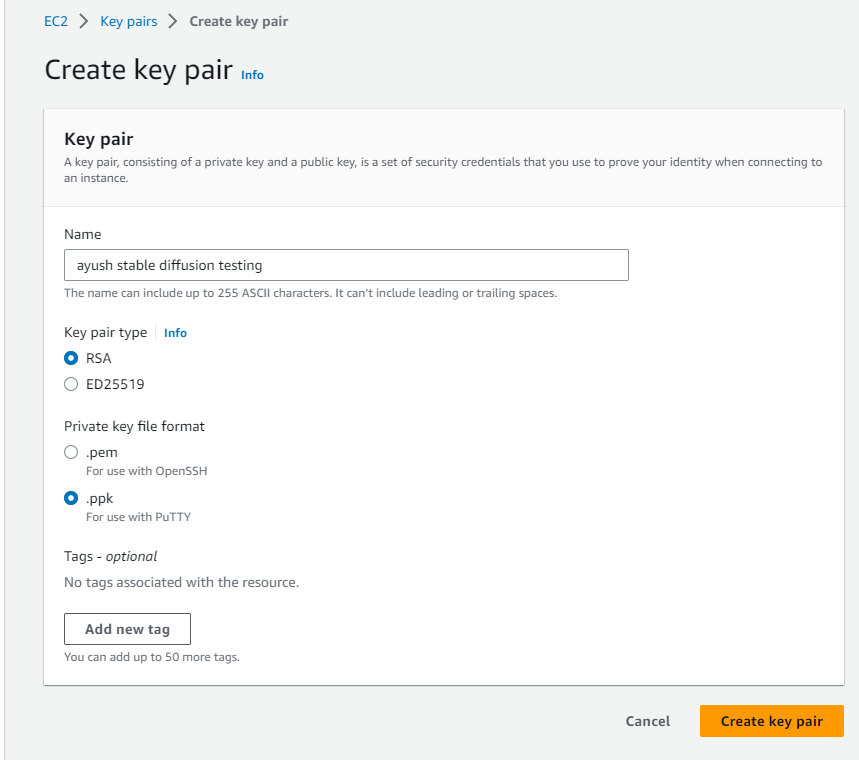
After Creating the Security Group, Now we create a Key Pair in EC2, it is not mandatory, you can also use existing keys, but we have created this in the tutorial. This will create a unique key for authentication time.
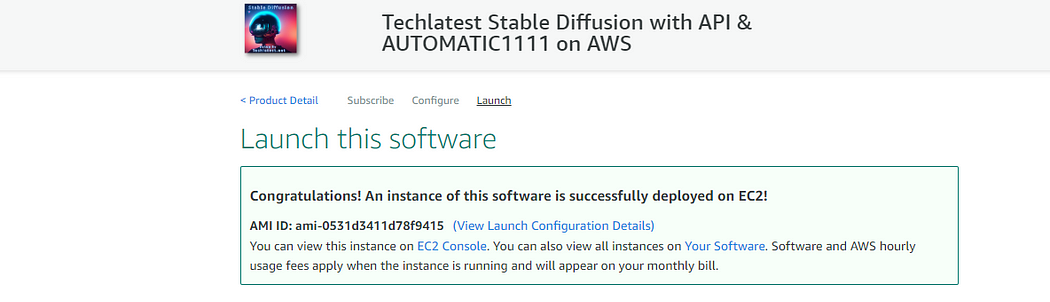
After all these Steps Click on the Launch Button, and Techlatest Stable Diffusion with AUTOMATIC1111 Web Interface will begin deploying.
Step 9
A summary page displays to see this instance on EC2 Console click on the EC2 Console link.
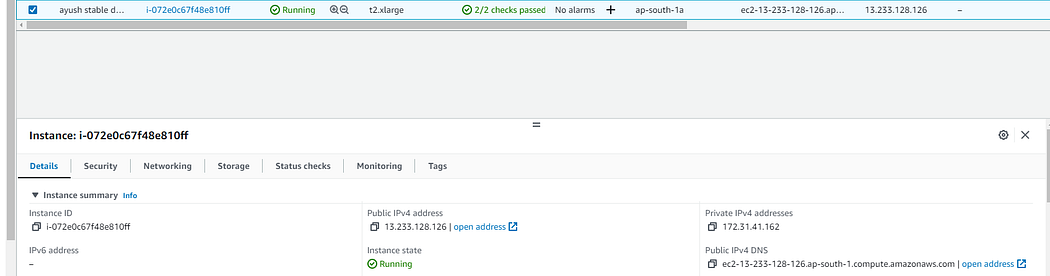
Step 10
After Clicking on the EC2 Console Option, the instance is up and running. One main step you have putty on your PC, if You don`t have putty then download it from Google, simply type download putty on Google and download it according to your operating system. To connect to this instance through putty, copy the IPv4 Public IP Address.
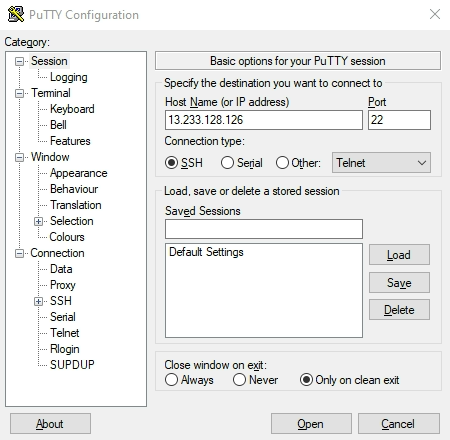
Step 11
The next step is, Open the Putty and paste the IP address.
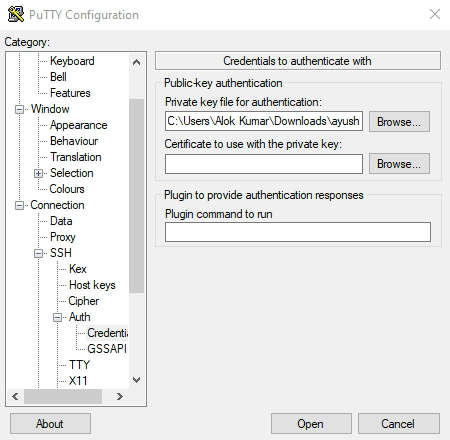
- Now browse the private key you downloaded while deploying the VM, by going to SSH->Auth and clicking on Open. Enter ubuntu as user-id.
You can see here what we have done with the Login Process, Once connected, change the password for the Ubuntu user using the below command.
sudo passwd ubuntu
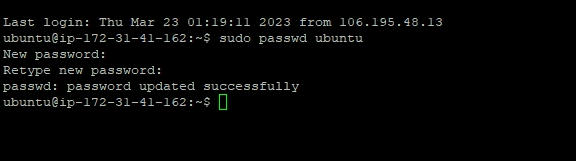
You can see here, we are also updating the password, now all are set.
Step 12
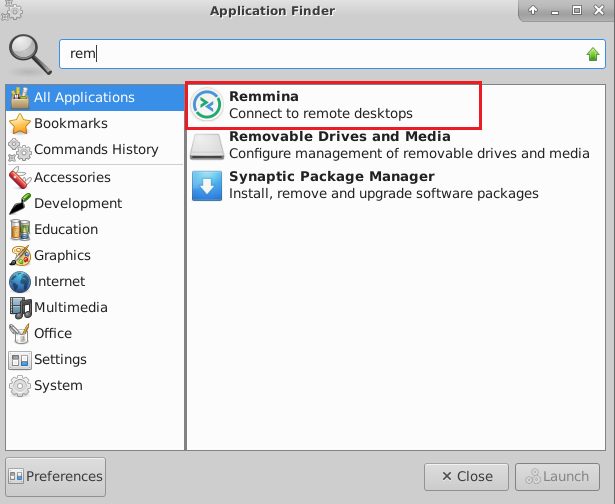
Now the password for the Ubuntu user is set, you can connect to the VM’s desktop environment from any local Windows Machine using RDP protocol or Linux Machine using Remmina.

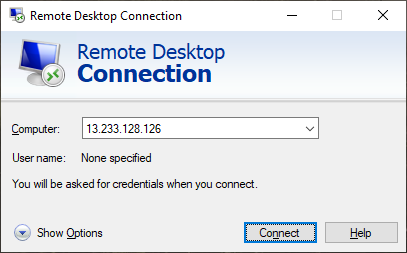
- From your local Windows machine, go to the “start” menu, in the search box type and select “Remote desktop connection”. In the “Remote Desktop Connection” wizard, copy the public IP address paste it, and click on the connect Button.
Step 13
This will connect you to the VM’s desktop environment. Provide the username (e.g. “ubuntu”) and the password set in the above “Reset password” step to authenticate. And then Click on the OK Button.

Step 14
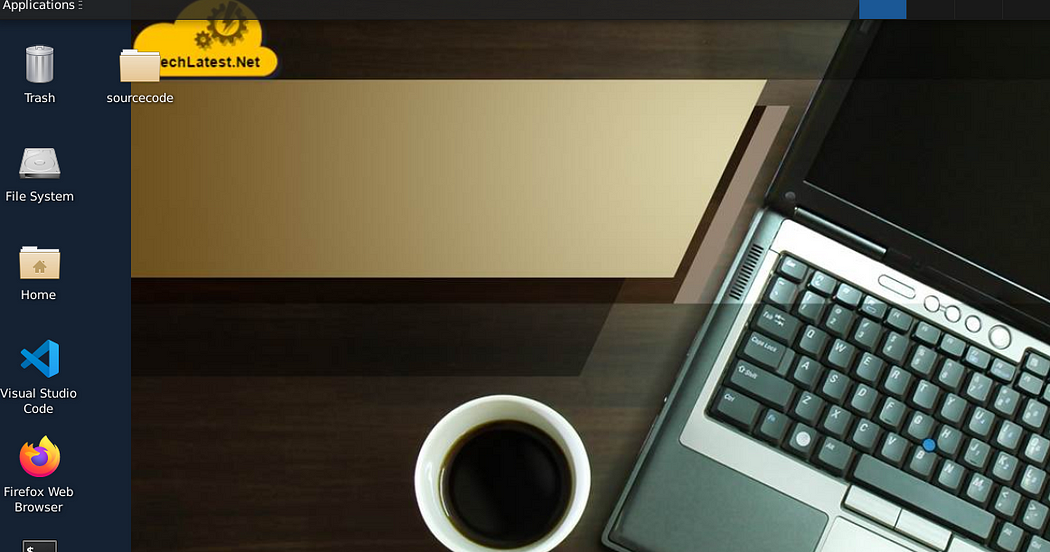
Finally, you are connected to the out-of-box Techlatest Stable Diffusion with AUTOMATIC1111 Web Interface environment via Windows Machine.
Step 15
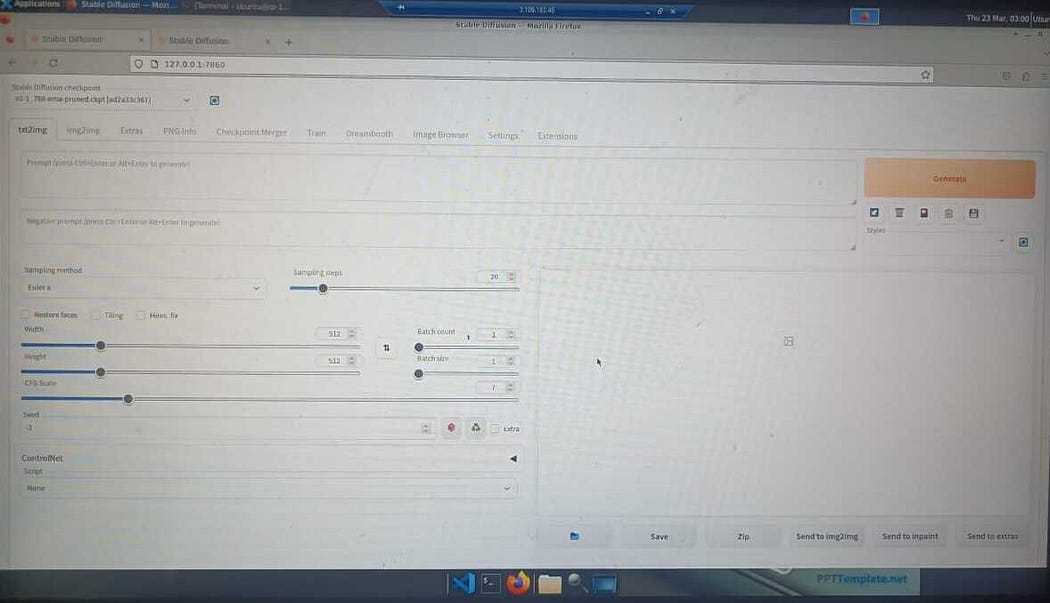
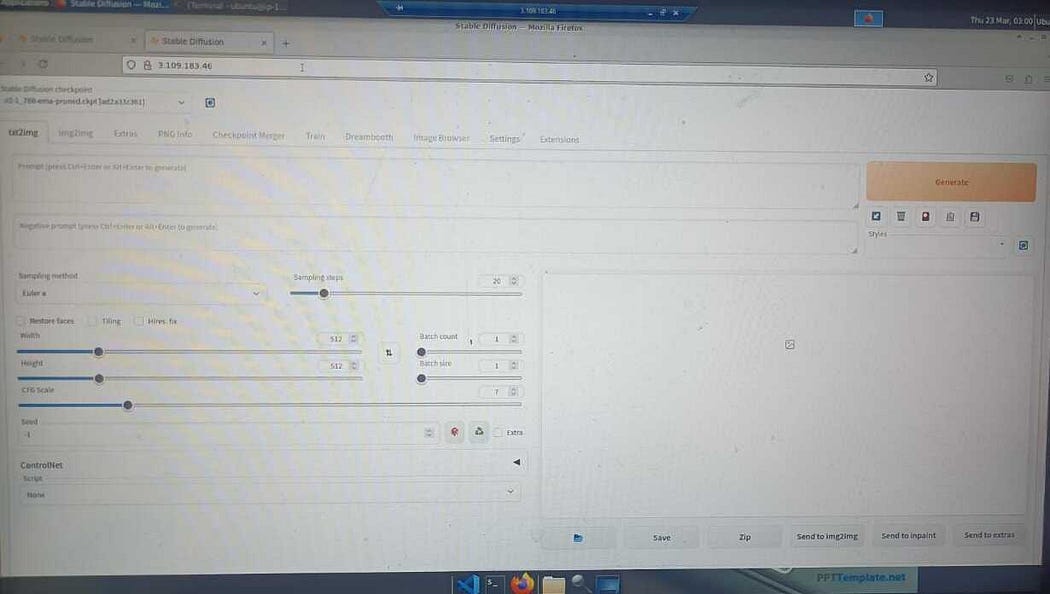
Now, To access the Stable Diffusion GUI via the browser, Copy the public IP of the VM and paste it into the browser and hit enter.
Important Notes
Please use HTTP and not HTTPS in the URL.
Please Note that for the first time, it will take 2–3 minutes to launch the app in the browser. So if GUI is not coming please try after a few minutes.
Step 16
CPU instances take time to launch the Web UI. To verify if Stable Diffusion Web UI is launched, Please run the below command in the terminal curl http://127.0.0.1:7860.
After Running This Command, If the output returns curl: (7) Failed to connect to 127.0.0.1 port 7860: Connection refused as shown below, then keep running the above curl command till HTML output is found.

- If this command returns HTML data as shown below, then Web UI is up and running.
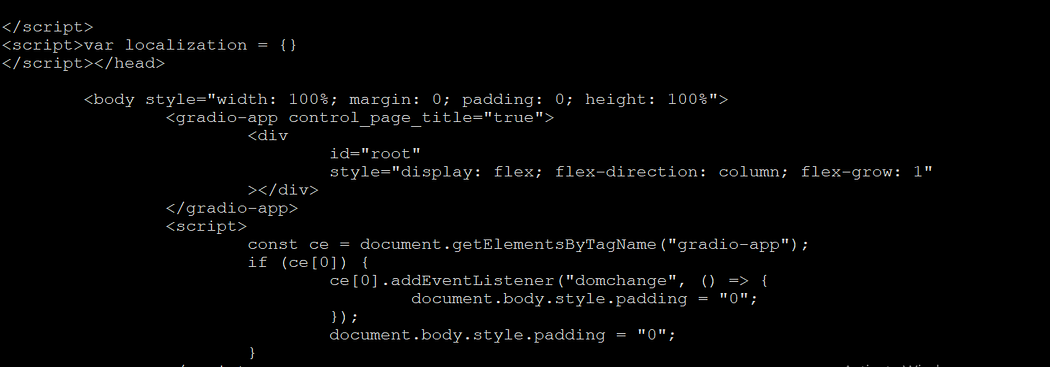
Now Web UI is up and running.
- Step 17
Step 18
The Stable Diffusion GUI comes with lots of options and settings. The first window shows text to the image page. Provide the Prompt and click on Generate button and wait till it finishes.
Step 19
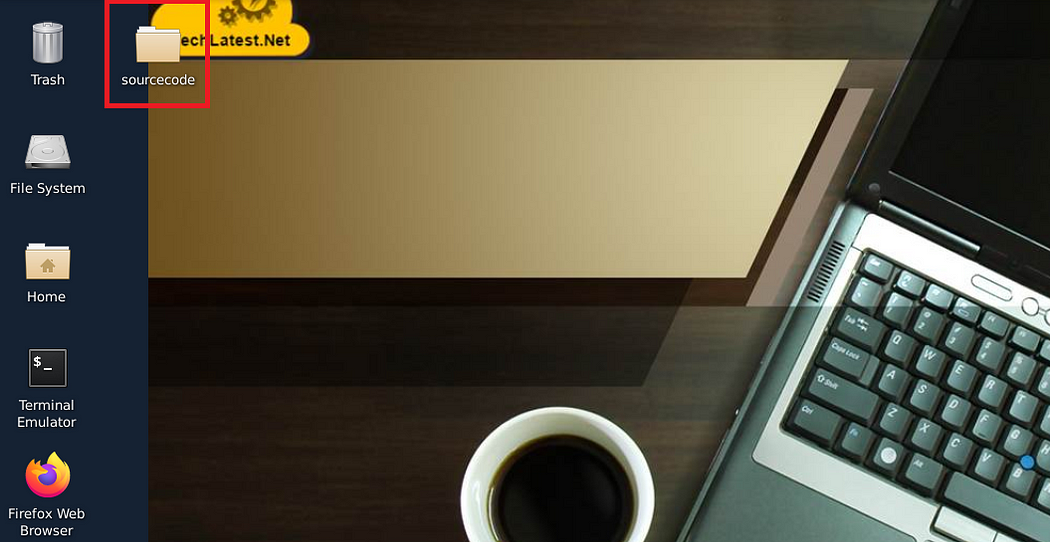
You can also access the source code of the Stable Diffusion. It is available under the sourcecode folder on the Desktop.
Step 20
You can also access the source code of the Stable Diffusion. It is available under the source code folder on the Desktop.
Step 21
For more information on how to use the GUI and its full features, please visit AUTOMATIC1111’s official documentation.
This concludes the step-by-step guide on how to set up Stable Diffusion with AUTOMATIC1111 on AWS (Amazon Web Services).
About TechLatest.net?
- TechLatest.net is a registered cloud partner with Amazon Web Services (AWS), Microsoft Azure, and Google Cloud Platform (GCP). It offers a comprehensive range of cloud-based products and solutions that come equipped with an array of out-of-the-box functionalities, pre-installed setups, demos, videos, tutorials, and various other tools that aid in expediting technology evaluation and adaption. Additionally, Techlatest’s products are readily available on popular marketplaces such as AWS Marketplace, Azure Marketplace, and Google Cloud Marketplace, providing customers with an opportunity to explore and experience them firsthand.